Setup Guide
You will need a Mikrotik router, a USB key with an ext4 partition and two ethernet cables, one to connect the router to your pc and the other one to give internet access to the router.
Powering up and updating os version
- Power up router (don't forget to plug in the antenna!). Connect to your PC via ethernet cable.
- Provide an internet connection to the router via another ethernet cable.
- Install and start winBox, you should see your device listed.
- Login to it with the admin pwd written on the bottom of your device (admin/WBJ6PZ033W), now it should be admin/toto1234.
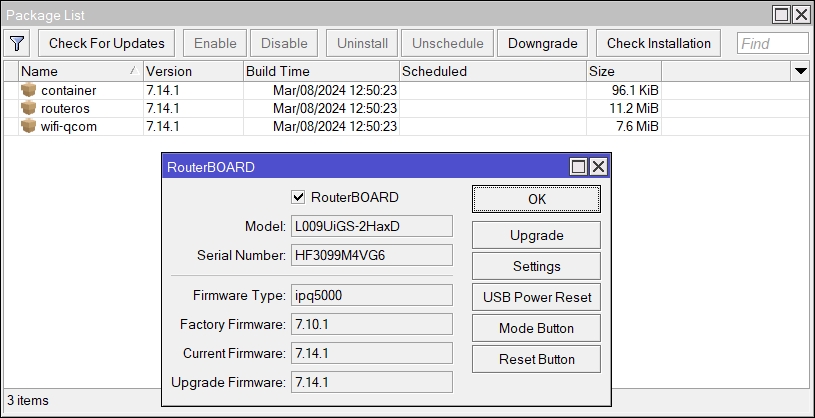
- Install latest version (7.14.1) of routerOS, you will need routerOS > V7.5 to be able to run containers. This can be done from inside WinBox by opening System/Package.
-
You may also need to update the routerBoard Version in system/RouterBOARD.
-
Install the container.npk. Download the all_package zip corresponding to your hardware architecture and software version (check with /system/resource/print), extract and drop the container.npk into winBox and restart the router with /sys reboot. After restarting, you should see a new tab called container in WinBox.
- To activate the container feature, enter /system device-mode update container=yes in the terminal. Then press the reset button of the router when asked so.
Configuration setup
A configuration script of a working system has been exported and is available in the github repo in router_config/config.rsc.
- Upload config.rsc to the router via WinBox.
- Import the script if not executed automatically:
import config.rsc - You can also run and adapt the commands listed in config.rsc manually in the router terminal if something is not working.
Adding or upgrading the container image
You can add or upgrade the container image like this :
- Login via WinBox.
- Make sure to give an internet access to the router via a ethernet cable.
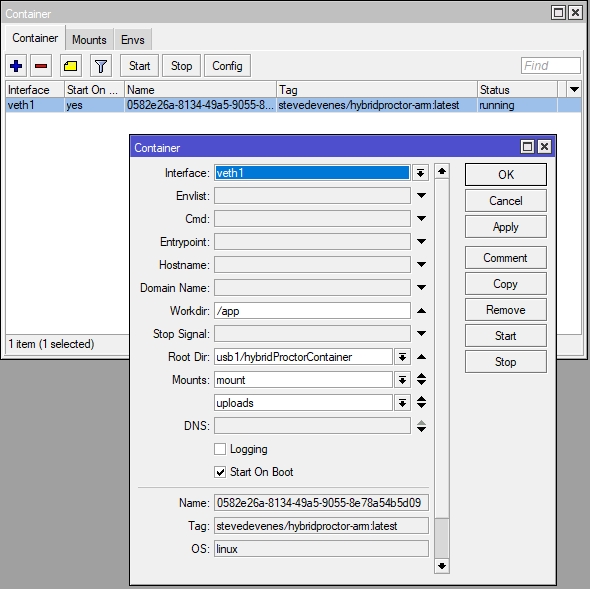
- Open the Container window to stop and delete the current container.
- Open a terminal and enter:
/container/add remote-image=enderastronaute/hybridproctor-arm-dev:latest interface=veth1 root-dir=usb1/HybridProctorContainer start-on-boot=yes logging=yes mounts=mount,uploads - The container should appear in the Container window: Start it!
OpenWRT setup
HybridProctor can alternatively be installed on a machine running OpenWRT.
Packages
It is strongly recommanded to use LuCi (the web GUI) to install packages.
Here's a list of what you'll need to install :
- kmod-usb-storage
- kmod-usb-storage-uas
- kmod-fs-ext4
- lsblk
- blkid
- node
Install
In order to install HybridProctor for your CPU architecture, you will need to download the corresponding ZIP file from the latest GitHub release :
For ARMv7 :
wget -O hybrid-proctor.zip "https://github.com/ISC-HEI/HybridProctor/releases/latest/download/hybrid-proctor-armv7.zip"
unzip hybrid-proctor.zip
For ARM64v8 :
wget -O hybrid-proctor.zip "https://github.com/ISC-HEI/HybridProctor/releases/latest/download/hybrid-proctor-armv64v8.zip"
unzip hybrid-proctor.zip
Starting the app
You can start the app using this command inside its directory :
npm run start
Automating the app start
OpenWRT uses procd to manage services. You can create a start script inside /etc/init.d/ to manage HybridProctor as a service :
!/bin/sh /etc/rc.common

START=99
STOP=10
USE_PROCD=1

start_service() {
  procd_open_instance
  procd_set_param command /bin/sh /root/hybrid_proctor/start.sh
  procd_set_param respawn
  procd_close_instance
}

stop_service() {
  PID=$(pgrep -f "node -r dotenv/config dist/index.mjs")
  [ -n "$PID" ] && kill $PID
}
Next, add the right to execute it :
chmod +x /etc/init.d/hybrid_proctor
You can now enable the service so starts at launch ; start it ; or stop it :
/etc/init.d/hybrid_proctor enable

/etc/init.d/hybrid_proctor start

/etc/init.d/hybrid_proctor stop
USB key
HybridProctor requires to have a USB-key plugged-in. Uploads, logs and password will be stored in it.
Automatically mounting
OpenWRT uses hotplug.d and not udev. They do quite the same thing except hotplug.d doesn't use rules but *ash scripts.
You can use this command to get the UUID and device of the USB key :
lsblk -f
You can then create the /etc/hotplug.d/block directory if it doesn't exist and write a new file in it containing :
[ "$ACTION" = "add" ] || exit 0

UUID=$(blkid -s UUID -o value "/dev/$DEVNAME" 2>/dev/null)

[ "$UUID" = "[WRITE THE DESIRED UUID]" ] || exit 0

mkdir -p /mnt/hybridproctor
mount "/dev/$DEVNAME" /mnt/hybridproctor
Nginx
Windows constantly checks if the current wifi connection has internet access and disconnects you if it's not the case. This means that we need to satisfy the check. This can be done with a simple reverse-proxy that responds to the Windows' requests.
The proxy subdirectory contains the required configuration files, you need to put nginx.conf in /etc/nginx/ and default.conf in /etc/nginx/conf.d/.
LuCi (The configuration webapp) uses uhttpd. Here's how to change the port used to allow nginx to run on :80 :
uci set uhttpd.main.listen_http='0.0.0.0:8000'
uci commit uhttpd
/etc/init.d/uhttpd restart
Permanent Redirect
A permanent redirect is set once you access LuCi. This means that your browser will access /cgi-bin/luci/ when going to /. To revert this behavior you just need to click "Forget about this site" in your browser history.
Changing the Wifi SSID / password
To avoid having multiple wifi with the same name, please change the SSID of any new configured system.
- In the Wifi window, open the wifi1 network pannel.
- Change the SSID in the Configuration tab
- Change the passphrase in the Security tab.